Tạo thanh điều hướng breadcrumbs trên Blogger

Người đăng: kiemdaigia on Thứ Năm, 14 tháng 10, 2010

Thanh điều hướng kiểu breadcrumbs (kiểu theo dấu vết ruột bánh mì) là thanh điều hướng cho phép người lướt web truy tìm nội dung theo chủ đề. Nó bắt nguồn từ câu chuyện dấu vết những cái ruột bánh mì bị bỏ lại bởi Hansel và Gretel trong truyện cổ tích nổi tiếng của anh em nhà Grimm.

Chuyện là thế này: Hansel và Gretel là 2 đứa trẻ trong một gia đình rất nghèo. Bố mẹ chúng nghèo quá đến nỗi không có gì để cho con cái ăn. Họ đã quyết định đem những đứa trẻ vào rừng và bỏ mặc chúng cho thú hoang ăn thịt. Hansel và Gretel đã phát hiện ra kế hoạch khủng khiếp này và có những biện pháp đề phòng trước. Chúng mang theo một cái bánh mì và thả rơi những mẫu ruột bánh mì dọc theo đường đi để tìm đường về nhà. Nhưng chẳng may chúng đã không tìm được đường về nhà và bị bắt giữ bởi một mụ phù thủy độc ác.

Từ câu chuyện này, ngày nay chúng ta có thể thấy thanh điều hướng theo kiểu “truy tìm đường theo mẫu ruột bánh mì” trên nhiều website để tìm lối trở lại Trang chủ.
Thanh điều hướng breadcrumbs xuất hiện nằm ngang trên đầu trang web, thường nằm dưới hoặc trên tiêu đề bài viết. Chúng cung cấp đường dẫn trở lại trang trước, đến một chủ đề nào đó hoặc trở về trang chủ. Nhìn chung người thiết kế thường sử dụng các dấu phân cách như > hoặc ».

Thanh điều hướng breadcrumbs điển hình trông như thế này:
Home » Thủ thuật Blogger » Tạo thanh điều hướng breadcrumbs trên Blogger

Sau đây là hướng dẫn thiết lập thanh điều hướng breadcrumb cho Blogger:
Bước 1: Đăng nhập Blogger, vào Bố cục (Layout) – Chỉnh sửa HTML (Edit HTML).
Nhớ backup Template của bạn và chọn Mở rộng Mẫu tiện ích (Expand Widget Template).

Bước 2: Tìm đoạn code sau đây (Nhấn Ctrl+F để tìm):

<b:include data='top' name='status-message'/>

Thay thế đoạn code trên bằng đoạn code sau đây:

<b:include data='top' name='status-message'/><b:include data='posts' name='breadcrumb'/>

Kế đến tìm đoạn code như bên dưới:

<b:includable id='main' var='top'>

và thêm trước nó với đoạn code sau đây:

<b:includable id='breadcrumbs' var='posts'>
<b:if cond='data:blog.homepageUrl == data:blog.url'>
<!-- No breadcrumbs on home page -->
<b:else/>
<b:if cond='data:blog.pageType == &quot;item&quot;'>
<!-- breadcrumbs for the post page -->
<p class='breadcrumbs'>
<span class='post-labels'>
<a expr:href='data:blog.homepageUrl' rel='tag'>Home</a>
<b:loop values='data:posts' var='post'>
<b:if cond='data:post.labels'>
<b:loop values='data:post.labels' var='label'>
<b:if cond='data:label.isLast == &quot;true&quot;'> &#187;
<a expr:href='data:label.url' rel='tag'><data:label.name/></a>
</b:if>
</b:loop>
<b:else/>
</b:if>
&#187; <span><data:post.title/></span>
</b:loop>
</span>
</p>
<b:else/>
<b:if cond='data:blog.pageType == &quot;archive&quot;'>
<!-- breadcrumb for the label archive page and search pages.. -->
<p class='breadcrumbs'>
<span class='post-labels'>
<a expr:href='data:blog.homepageUrl'>Home</a> &#187;
<data:blog.pageName/>
</span>
</p>
<b:else/>
<b:if cond='data:blog.pageType == &quot;index&quot;'>
<p class='breadcrumbs'>
<span class='post-labels'>
<b:if cond='data:blog.pageName == &quot;&quot;'>
<a expr:href='data:blog.homepageUrl'>Home</a> &#187;
<b:else/>
<a expr:href='data:blog.homepageUrl'>Home</a> &#187;
<data:blog.pageName/>
</b:if>
</span>
</p>
</b:if>
</b:if>
</b:if>
</b:if>
</b:includable>

Bước 3: Thêm đoạn code dưới đây vào trước dòng ]]></b:skin>.

.breadcrumbs {
padding:5px 5px 5px 0px;
margin: 0px 0px 15px 0px;
font-size:95%;
line-height: 1.4em;
border-bottom:3px double #e6e4e3;
}

Lưu Template lại là xong. Lúc này bạn có thể kiểm tra thanh điều hướng breadcrumbs hoạt động trên blog của bạn rồi đấy.

Lưu ý nếu bạn sử dụng nhiều nhãn (label) cho một bài viết thì breadcrumbs chỉ hiển thị nhãn cuối cùng mà bạn đã thêm vào. Thủ thuật trên đã thử thành công trên các Template dạng layout. Tôi đã có một số điều chỉnh nhỏ cho thích hợp với blog có ngôn ngữ tiếng Việt.
More about

Hiển thị đoạn mã trong bài đăng Blogger

Người đăng: kiemdaigia

Đối với các bạn sử dụng Blogger đặc biệt trong trường hợp muốn giới thiệu các đoạn mã (code) để cùng chia sẻ với cộng đồng Blogger, việc hiển thị các đoạn mã là điều khó khăn, đôi khi không thể đối với người mới dùng (newbie) Blogger.
Trường hợp muốn hiển thị mã HTML trong các bài đăng thì phải sử dụng các ký tự XHTML để thay thế:

"&quot;
&&amp;
<&lt;
>&gt;


Trường hợp bạn muốn trình bày các đoạn mã phức tạp trong các bài đăng, bạn nên theo các bước sau đây:
Bước 1: Đăng nhập vào tài khoản Blogger đến phần Bố cục (Layout) trong Bảng điều khiến. Sau đó đến phần Chỉnh sửa HTML (Edit HTML).
Bước 2: Thêm đoạn mã CSS bên dưới trên phần ]]></b:skin> (ấn tổ hợp phím Ctrl + F để tìm cho nhanh).

.codeview {
margin : 15px 35px 15px 15px;
padding : 10px;
clear : both;
list-style-type : none;
background : #f9f9f9;
border-top : 1px solid #eeeeee;
border-right : 2px solid #cccccc;
border-bottom : 2px solid #cccccc;
border-left : 1px solid #eeeeee;
}
.codeview li {
font-size : 13px;
line-height : 24px;
font-family : "Courier New", "MS Sans Serif", sans-serif, serif;
color : #333333;
font-weight : normal;
margin : 0;
padding : 0;
}

Bạn có thể tùy chỉnh các thông số trong đoạn mã trên theo ý thích của mình.
Bước 3: Mỗi khi bạn tạo bài đăng mới có trình bày các đoạn mã (CSS, Scripts, HTML, …) thì chỉ cần đặt đoạn mã đó trong phần div như sau:

<div class="codeview">
Chèn đoạn mã bạn muốn hiển thị
</div>
More about

Ẩn bài viết ở trang chủ Blogger

Người đăng: kiemdaigia

(Huynh Nhat Ha's Blog) -- Trong một số trường hợp khi thiết kế Blogger, bạn cần đến việc ẩn các bài viết ở trang chủ. Trường hợp này có thể thực hiện bằng việc kết hợp CSS với câu lệnh điều kiện.

Trước hết bạn cần xác định id của widget "Bài đăng trên Blog", thông thường nó đều có id là "Blog1". Tìm nó bằng cách vào chỉnh sửa HTML của Template ở trạng thái mở rộng mẫu tiện ích.

Sau khi xác định được id này, ta thực hiện các bước sau:

1. Vào Bố cục (Layout).
2. Vào Chỉnh sửa HTML (HTML) của Template.
3. Chèn đoạn code bên dưới vào sau dòng ]]></b:skin>.

<style>
<b:if cond='data:blog.url == data:blog.homepageUrl'>

#Blog1 {
display:none;
visibility:hidden;
}

</b:if>
</style>
More about

Tạo menu kiểu tab view trình chiếu slide

Người đăng: kiemdaigia

Trên trang nhà của Elliott Wave Vietnam, bạn có thể thấy thanh menu dạng tab view trình chiếu slide theo các số 1, 2, 3, 4… rất thú vị. Kiểu menu này giúp cho blog của bạn trở nên sống động hơn. Có một số bạn đọc yêu cầu tôi hướng dẫn thủ thuật này. Do thời gian qua bận rộn nên chưa thể đáp ứng yêu cầu đó. Nay tôi sẽ tranh thủ hướng dẫn thủ thuật này cho bạn đọc tham khảo.


Bước 1: Đăng nhập vào Blogger. Vào Bố cục (Layout) – Chỉnh sửa HTML (Edit HTML). Chọn Tải xuống mẫu đầy đủ (Download Full template) để back up Template của bạn trước khi thực hiện thao tác chỉnh sửa.
Bước 2: Copy đoạn mã dưới đây rồi dán nó trước đoạn mã ]]></b:skin>.

.indentmenu{
font: bold 11px Arial;
width: 100%; /*leave this value as is in most cases*/

}

.indentmenu ul{
margin: 2px;
padding: 0;
float: left;
/* width: 80%; width of menu*/
background: transparent;
}

.indentmenu ul li{
display: inline;
}

.indentmenu ul li a{
float: left;
margin: 2px;
color: #000; /*text color*/
padding: 5px 11px;
text-decoration: none;
border: 1px solid #ccc;
}

.indentmenu ul li a:hover{
background:#ddd;
}

.indentmenu ul li a:visited{
color: white;
}

.indentmenu ul li a.selected{
color: white !important;
padding-top: 6px; /*shift text down 1px*/
padding-bottom: 4px;
border: 1px solid #000000;
background:#000000;
}

.tabcontentstyle{ /*style of tab content container*/
border: 1px solid gray;
width: 450px;
margin-bottom: 1em;
padding: 10px;
}

.tabcontent{
display:none;
}

@media print {
.tabcontent {
display:block !important;
}
}

Bạn nên chỉnh sửa thông số đánh dấu màu xanh để phù hợp với bề rộng chỗ đặt menu trên blog của bạn.
Bước 3: Copy đoạn mã dưới đây rồi dán vào trước thẻ mở <head>. Phần code này khá dài, bạn cố chịu khó với thao tác để có thể thành công.

<script type='text/javascript'>
//<![CDATA[
//** Tab Content script v2.0- © Dynamic Drive DHTML code library (http://www.dynamicdrive.com)
//** Updated Oct 7th, 07 to version 2.0. Contains numerous improvements:
// -Added Auto Mode: Script auto rotates the tabs based on an interval, until a tab is explicitly selected
// -Ability to expand/contract arbitrary DIVs on the page as the tabbed content is expanded/ contracted
// -Ability to dynamically select a tab either based on its position within its peers, or its ID attribute (give the target tab one 1st)
// -Ability to set where the CSS classname "selected" get assigned- either to the target tab's link ("A"), or its parent container
//** Updated Feb 18th, 08 to version 2.1: Adds a "tabinstance.cycleit(dir)" method to cycle forward or backward between tabs dynamically
//** Updated April 8th, 08 to version 2.2: Adds support for expanding a tab using a URL parameter (ie: http://mysite.com/tabcontent.htm?tabinterfaceid=0)

////Don't need to edit below////////////////////////

function ddtabcontent(tabinterfaceid){
this.tabinterfaceid=tabinterfaceid //ID of Tab Menu main container
this.tabs=document.getElementById(tabinterfaceid).getElementsByTagName("a") //Get all tab links within container
this.enabletabpersistence=true
this.hottabspositions=[] //Array to store position of tabs that have a "rel" attr defined, relative to all tab links, within container
this.currentTabIndex=0 //Index of currently selected hot tab (tab with sub content) within hottabspositions[] array
this.subcontentids=[] //Array to store ids of the sub contents ("rel" attr values)
this.revcontentids=[] //Array to store ids of arbitrary contents to expand/contact as well ("rev" attr values)
this.selectedClassTarget="link" //keyword to indicate which target element to assign "selected" CSS class ("linkparent" or "link")
}

ddtabcontent.getCookie=function(Name){
var re=new RegExp(Name+"=[^;]+", "i"); //construct RE to search for target name/value pair
if (document.cookie.match(re)) //if cookie found
return document.cookie.match(re)[0].split("=")[1] //return its value
return ""
}

ddtabcontent.setCookie=function(name, value){
document.cookie = name+"="+value+";path=/" //cookie value is domain wide (path=/)
}

ddtabcontent.prototype={

expandit:function(tabid_or_position){ //PUBLIC function to select a tab either by its ID or position(int) within its peers
this.cancelautorun() //stop auto cycling of tabs (if running)
var tabref=""
try{
if (typeof tabid_or_position=="string" && document.getElementById(tabid_or_position).getAttribute("rel")) //if specified tab contains "rel" attr
tabref=document.getElementById(tabid_or_position)
else if (parseInt(tabid_or_position)!=NaN && this.tabs[tabid_or_position].getAttribute("rel")) //if specified tab contains "rel" attr
tabref=this.tabs[tabid_or_position]
}
catch(err){alert("Invalid Tab ID or position entered!")}
if (tabref!="") //if a valid tab is found based on function parameter
this.expandtab(tabref) //expand this tab
},

cycleit:function(dir, autorun){ //PUBLIC function to move foward or backwards through each hot tab (tabinstance.cycleit('foward/back') )
if (dir=="next"){
var currentTabIndex=(this.currentTabIndex<this.hottabspositions.length-1)? this.currentTabIndex+1 : 0
}
else if (dir=="prev"){
var currentTabIndex=(this.currentTabIndex>0)? this.currentTabIndex-1 : this.hottabspositions.length-1
}
if (typeof autorun=="undefined") //if cycleit() is being called by user, versus autorun() function
this.cancelautorun() //stop auto cycling of tabs (if running)
this.expandtab(this.tabs[this.hottabspositions[currentTabIndex]])
},

setpersist:function(bool){ //PUBLIC function to toggle persistence feature
this.enabletabpersistence=bool
},

setselectedClassTarget:function(objstr){ //PUBLIC function to set which target element to assign "selected" CSS class ("linkparent" or "link")
this.selectedClassTarget=objstr "link"
},

getselectedClassTarget:function(tabref){ //Returns target element to assign "selected" CSS class to
return (this.selectedClassTarget==("linkparent".toLowerCase()))? tabref.parentNode : tabref
},

urlparamselect:function(tabinterfaceid){
var result=window.location.search.match(new RegExp(tabinterfaceid+"=(\d+)", "i")) //check for "?tabinterfaceid=2" in URL
return (result==null)? null : parseInt(RegExp.$1) //returns null or index, where index (int) is the selected tab's index
},

expandtab:function(tabref){
var subcontentid=tabref.getAttribute("rel") //Get id of subcontent to expand
//Get "rev" attr as a string of IDs in the format ",john,george,trey,etc," to easily search through
var associatedrevids=(tabref.getAttribute("rev"))? ","+tabref.getAttribute("rev").replace(/s+/, "")+"," : ""
this.expandsubcontent(subcontentid)
this.expandrevcontent(associatedrevids)
for (var i=0; i<this.tabs.length; i++){ //Loop through all tabs, and assign only the selected tab the CSS class "selected"
this.getselectedClassTarget(this.tabs[i]).className=(this.tabs[i].getAttribute("rel")==subcontentid)? "selected" : ""
}
if (this.enabletabpersistence) //if persistence enabled, save selected tab position(int) relative to its peers
ddtabcontent.setCookie(this.tabinterfaceid, tabref.tabposition)
this.setcurrenttabindex(tabref.tabposition) //remember position of selected tab within hottabspositions[] array
},

expandsubcontent:function(subcontentid){
for (var i=0; i<this.subcontentids.length; i++){
var subcontent=document.getElementById(this.subcontentids[i]) //cache current subcontent obj (in for loop)
subcontent.style.display=(subcontent.id==subcontentid)? "block" : "none" //"show" or hide sub content based on matching id attr value
}
},

expandrevcontent:function(associatedrevids){
var allrevids=this.revcontentids
for (var i=0; i<allrevids.length; i++){ //Loop through rev attributes for all tabs in this tab interface
//if any values stored within associatedrevids matches one within allrevids, expand that DIV, otherwise, contract it
document.getElementById(allrevids[i]).style.display=(associatedrevids.indexOf(","+allrevids[i]+",")!=-1)? "block" : "none"
}
},

setcurrenttabindex:function(tabposition){ //store current position of tab (within hottabspositions[] array)
for (var i=0; i<this.hottabspositions.length; i++){
if (tabposition==this.hottabspositions[i]){
this.currentTabIndex=i
break
}
}
},

autorun:function(){ //function to auto cycle through and select tabs based on a set interval
this.cycleit('next', true)
},

cancelautorun:function(){
if (typeof this.autoruntimer!="undefined")
clearInterval(this.autoruntimer)
},

init:function(automodeperiod){
var persistedtab=ddtabcontent.getCookie(this.tabinterfaceid) //get position of persisted tab (applicable if persistence is enabled)
var selectedtab=-1 //Currently selected tab index (-1 meaning none)
var selectedtabfromurl=this.urlparamselect(this.tabinterfaceid) //returns null or index from: tabcontent.htm?tabinterfaceid=index
this.automodeperiod=automodeperiod 0
for (var i=0; i<this.tabs.length; i++){
this.tabs[i].tabposition=i //remember position of tab relative to its peers
if (this.tabs[i].getAttribute("rel")){
var tabinstance=this
this.hottabspositions[this.hottabspositions.length]=i //store position of "hot" tab ("rel" attr defined) relative to its peers
this.subcontentids[this.subcontentids.length]=this.tabs[i].getAttribute("rel") //store id of sub content ("rel" attr value)
this.tabs[i].onclick=function(){
tabinstance.expandtab(this)
tabinstance.cancelautorun() //stop auto cycling of tabs (if running)
return false
}
if (this.tabs[i].getAttribute("rev")){ //if "rev" attr defined, store each value within "rev" as an array element
this.revcontentids=this.revcontentids.concat(this.tabs[i].getAttribute("rev").split(/s*,s*/))
}
if (selectedtabfromurl==i this.enabletabpersistence && selectedtab==-1 && parseInt(persistedtab)==i !this.enabletabpersistence && selectedtab==-1 && this.getselectedClassTarget(this.tabs[i]).className=="selected"){
selectedtab=i //Selected tab index, if found
}
}
} //END for loop
if (selectedtab!=-1) //if a valid default selected tab index is found
this.expandtab(this.tabs[selectedtab]) //expand selected tab (either from URL parameter, persistent feature, or class="selected" class)
else //if no valid default selected index found
this.expandtab(this.tabs[this.hottabspositions[0]]) //Just select first tab that contains a "rel" attr
if (parseInt(this.automodeperiod)>500 && this.hottabspositions.length>1){
this.autoruntimer=setInterval(function(){tabinstance.autorun()}, this.automodeperiod)
}
} //END int() function

} //END Prototype assignment

//]]>
</script>

Không chỉnh sửa bất kỳ chỗ nào trong phần code trên. Sau đó Lưu mẫu (Save Template).
Bước 4: Đến Phần tử trang (Page Elements) và chọn Thêm Tiện ích (Add a Gadget). Tiếp đến bạn chọn HTML/Javascript rồi dán đoạn mã bên dưới vào trong tiện ích đó, có thể để trống tiêu đề của tiện ích.

<div style="float:left;margin:0px 10px 0px 0px;padding:0px;height:230px;">

<div id="pettabs" class="indentmenu">

<ul>
<li><a href="#" class="selected" rel="tab1">1</a></li>
<li><a href="#" rel="tab2">2</a></li>
<li><a href="#" rel="tab3">3</a></li>
<li><a href="#" rel="tab4">4</a></li>

</ul>
<br style="clear: left"/>
</div>

<div style="width:150px;text-align:justify;padding: 5px; margin-bottom:1em">

<div id="tab1" class="tabcontent">
<a href="http://blogcuaban.blogspot.com">
<img border="0" style="border-right: 0px; border-top: 0px; border-left: 0px; border-bottom: 0px" alt="obamabush" width="150" src="URL hinh dai dien 1?imgmax=800" height="230" title="Ten hinh dai dien 1"/></a>

<p><h3><a href="http://blogcuaban.blogspot.com">Tieu de 1</a></h3></p>

Noi dung mo ta trinh chieu 1
</div>

<div id="tab2" class="tabcontent">
<a href="http://blogcuaban.blogspot.com">
<img border="0" style="border-right: 0px; border-top: 0px; border-left: 0px; border-bottom: 0px" alt="beyone" width="150" src=" URL hinh dai dien 2?imgmax=800" height="230" title="Ten hinh dai dien 2"/></a>
<p><h3><a href="http://blogcuaban.blogspot.com">Tieu de 2</a></h3></p>

Noi dung mo ta trinh chieu 2
</div>

<div id="tab3" class="tabcontent">
<a href="http://blogcuaban.blogspot.com">
<img border="0" style="border-right: 0px; border-top: 0px; border-left: 0px; border-bottom: 0px" alt="Guns N 'Roses" width="150" src=" URL hinh dai dien 3?imgmax=800" height="230" title="Ten hinh dai dien 3"/></a>
<p><h3><a href="http://blogcuaban.blogspot.com">Tieu de 3</a></h3></p>

Noi dung mo ta trinh chieu 3
</div>

<div id="tab4" class="tabcontent">
<a href="http://blogcuaban.blogspot.com">
<img border="0" style="border-right: 0px; border-top: 0px; border-left: 0px; border-bottom: 0px" alt="ipod" width="150" src=" URL hinh dai dien 4?imgmax=800" height="230" title="Ten hinh dai dien 4"/></a>
<p><h3><a href="http://blogcuaban.blogspot.com">Tieu de 4</a></h3></p>

Noi dung mo ra trinh chieu 4
</div> </div>

<script type="text/javascript">

var mypets=new ddtabcontent("pettabs")
mypets.setpersist(true)
mypets.setselectedClassTarget("link")
mypets.init(2100)

</script>

Như vậy nếu bạn muốn có 4 tab trình chiếu thì cần phải upload 4 hình đại diện lên webhost để lấy đường dẫn (URL) rồi thay lần lượt cho các đường dẫn trong phần màu xanh. Ngoài ra cần phải điều chỉnh thông số width:150pxheight:230px cho phù hợp với hình ảnh và bề rộng menu tại vị trí bạn muốn hiển thị. Bạn muốn thêm số trình chiếu thì thêm hình đại diện, tiêu đề, phần miêu tả tương ứng.
Thủ thuật này được điều chỉnh từ một thủ thuật web của Dynamicdrive.com.
More about

Trang trí khung hiển thị code trên Blogger

Người đăng: kiemdaigia

Đôi khi bạn cũng muốn trang trí khung hiển thị các đoạn mã (code) cho đẹp mắt. Để thực hiện điều này, bạn cần phải tạo một class riêng cho đoạn mã, có thể đặt tên là "codeview" và đặt đoạn mã vào trong thẻ div, theo như bên dưới:

<div class="codeview">
{dán code đơn giản hoặc code đã mã hóa vào đây}
</div>

Phần trên sẽ được đặt vào trong bài viết tại vị trí muốn hiển thị code.
Để đăng được bài viết có hiển thị code thì phải tiến hành chèn một đoạn mã vào phần CSS của Template.

Vào Thiết kế (Design) - Chỉnh sửa HTML (Edit HTML) rồi chèn code của các kiểu bên dưới lên trên dòng code ]]></b:skin> trong Template.

Dưới đây là các kiểu định dạng CSS cho codeview.
1. Kiểu 1:
.codeview {
margin : 15px 35px 15px 15px;
padding : 10px;
clear : both;
list-style-type : none;
background : #f9f9f9 url(http://farm4.static.flickr.com/3415/3555944482_d0433d99fe_o.gif) no-repeat right bottom;
border-top : 1px solid #eeeeee;
border-right : 2px solid #cccccc;
border-bottom : 2px solid #cccccc;
border-left : 1px solid #eeeeee;
}

2. Kiểu 2:
.codeview {
margin : 15px 35px 15px 15px;
padding : 10px;
clear : both;
list-style-type : none;
background : #f9f9f9;
border-right : 2px solid #cccccc;
border-bottom : 2px solid #cccccc;
border-left : 20px solid #CECECE;
}

3. Kiểu 3:
.codeview {
margin : 15px 35px 15px 15px;
padding : 10px;
clear : both;
list-style-type : none;
background : #f9f9f9 url(http://farm4.static.flickr.com/3575/3555191103_7ce001f502_o.gif) no-repeat right top;
border-top : 1px solid #eeeeee;
border-right : 2px solid #cccccc;
border-bottom : 2px solid #cccccc;
border-left : 1px solid #eeeeee;
}

Chú ý: Nên tải các file hình ảnh qua đường link đánh dấu màu xanh về và upload lên webhost của riêng bạn để tránh hạn chế băng thông.

Tham khảo theo Fandung.com
More about

Hiển thị danh ngôn ngẫu nhiên sử dụng JavaScript

Người đăng: kiemdaigia

Khi thiết kế website hoặc webblog, đôi khi chúng ta cần hiển thị một chuỗi câu trích dẫn hay chuỗi câu danh ngôn nổi tiếng theo kiểu ngẫu nhiên để tạo sự nổi bật cho trang web. Trong trường hợp này có thể sử dụng ngôn ngữ JavaScript khá đơn giản để có được kết quả mong muốn.

Xem DEMO

Cấu trúc HTML cho website có dạng như sau:

<html xmlns="http://www.w3.org/1999/xhtml">
<head>
<title>Hiển thị danh ngôn ngẫu nhiên</title>
<meta content="Huynh Nhat Ha" name="author" />
</head>
<body>

<div> >>>Đối với Blogger dùng từ dòng này
<p id="quoteWrapper"></p>
</div>


<script type="text/javascript">

var Quotes =
{
getRandomQuote: function()
{
var quote = [];
quote[0] = "When you have given nothing, ask for nothing.";
quote[1] = "Good habits result from resisting temptation.";
quote[2] = "If you bow at all, bow low.";
quote[3] = "Examine what is said, not him who speaks.";
quote[4] = "Make your bargain before beginning to plow.";
quote[5] = "Don't make use of another's mouth unless it has been lent to you.";
quote[6] = "Seize opportunity by the beard, for it is bald behind.";
quote[7] = "Be not afraid of growing slowly, be afraid only of standing still.";
quote[8] = "Do not employ handsome servants.";
quote[9] = "Do not remove a fly from your friend's forehead with a hatchet.";

var maxLength = quote.length;
var position = Math.floor(Math.random() * maxLength);
return Quotes.displayQuote("quoteWrapper", quote[position]);
},
displayQuote: function(ctl, quote)
{
ctl = document.getElementById(ctl);
ctl.innerHTML = quote;
}
};

Quotes.getRandomQuote();

</script> >>>Đối với Blogger kết thúc tại dòng này</body>
</html>

Chúng ta có thể thay đổi câu danh ngôn hay trích dẫn tùy ý, có thể tăng số lượng hiển thị ngẫu nhiên lên 10, 11, 12, ... n,...

Đối với Blogger, bạn chỉ cần dán đoạn code giữa 2 phần đánh dấu màu đỏ vào một tiện ích (widget) tại nơi bạn muốn hiển thị trên blog của bạn là xong.

Sau đây là một cách khác cũng khá giống với cách trên.

Chèn đoạn code dưới đây trước thẻ </head>.

<script language="JavaScript">

function rotateEvery(sec)
{
var Quotation=new Array()

// QUOTATIONS
Quotation[0] = 'First quotation';
Quotation[1] = 'Second quotation';
Quotation[2] = 'Third quotation';
Quotation[3] = 'Fourth quotation';
Quotation[4] = 'Fifth quotation';
Quotation[5] = 'Sixth quotation';
Quotation[6] = 'You can add as many quotations as you like';

var which = Math.round(Math.random()*(Quotation.length - 1));
document.getElementById('textrotator').innerHTML = Quotation[which];

setTimeout('rotateEvery('+sec+')', sec*1000);
}
</script>

Lưu ý bạn phải thay các quotation bằng câu danh ngôn bạn lựa chọn để hiển thị.
Thay thế thẻ <body> bằng thẻ: <body onload="rotateEvery(1)">.
Sau đó chèn đoạn code dưới đây vào vị trí bạn muốn hiển thị trên web hay blog của bạn.

<div id="textrotator"><!--Quotations will be displayed here--></div>
Chúc bạn thành công!
More about

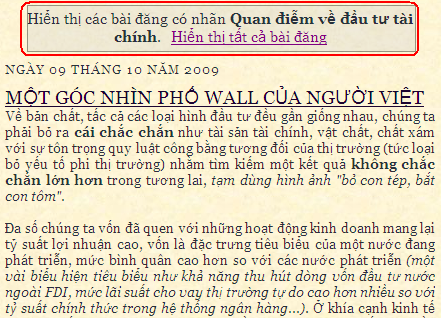
Cách xóa phần “Hiển thị các bài đăng có nhãn …”

Người đăng: kiemdaigia

Khi thiết kế blog trên Blogger, mỗi khi sử dụng liên kết đến các nhãn (label), việc kích chuột vào liên kết nhãn thường dẫn đến một trang mà ở đầu trang xuất hiện một dòng hiển thị trạng thái báo kết quả các bài viết thuộc nhãn đó với nội dung “Hiển thị các bài đăng có nhãn … Hiển thị tất cả bài đăng.” Đặc điểm này dường như làm mất đi vẻ hấp dẫn của một blog chuyên nghiệp.

Sau đây tôi sẽ hướng dẫn một thủ thuật đơn giản để loại bỏ trạng thái này.

Bước 1: Vào Bố cục (Layout) - Chỉnh sửa HTML (Edit HTML). Bạn cần backup Template của mình trước khi chỉnh sửa. Chọn Mở rộng Mẫu tiện ích (Expand Widget Templates). Sau đó tìm đoạn mã dưới đây:


<b:includable id='main' var='top'>
<!-- posts -->
<div class='blog-posts'>
<b:includable id='status-message'> << Bước 2 (2): Xóa dòng này<b:if cond='data:navMessage'> << Bước 2 (1): Xóa dòng này<div class='status-msg-wrap'>
<div class='status-msg-body'>
<data:navMessage/>
</div>
<div class='status-msg-border'>
<div class='status-msg-bg'>
<div class='status-msg-hidden'><data:navMessage/></div>
</div>
</div>
</div>
<div style='clear: both;'/>
</b:if> << Bước 2 (1): Xóa dòng này
</b:includable> << Bước 2 (2): Xóa dòng này

Bước 2: Xóa một số đoạn mã riêng biệt theo 2 hướng dẫn:
(1) Trước tiên hãy xóa 2 phần code đánh dấu màu xanh, lưu Template rồi đăng xuất Blogger để xem kết quả trên blog của bạn.
(2) Nếu bước 2 (1) không thành công thì do thiết kế Template của bạn có lỗi gì đó. Lúc này hãy thực hiện tiến trình tương tự từ Bước 1 sang Bước 2 rồi xóa luôn 2 phần code đánh dấu màu đỏ. Lưu Template rồi đăng xuất Blogger để xem kết quả trên blog của bạn.
(3) Chú ý một số Template mới lấy từ các nguồn cung cấp Blogger Template miễn phí thì phải tìm xóa đoạn code dưới đây:

<b:include data='top' name='status-message'/>

(4) Nếu các bước trên không thành công thì bạn có thể tham khảo cách này, bằng việc sử dụng thủ thuật CSS đơn giản: Chèn đoạn mã sau vào trước dòng ]]></b:skin>.

.status-msg-wrap{
display:none;
}


Hy vọng bạn sẽ tìm thấy sự thú vị từ thủ thuật này. Và nhớ backup Template của bạn sau khi thực hiện thành công thủ thuật này nhé.
More about