Để cài đặt, trước tiên bạn hãy xem phần Demo, sau đó lần lượt đọc qua các bước theo thứ tự Script >> CSS >> HTML.
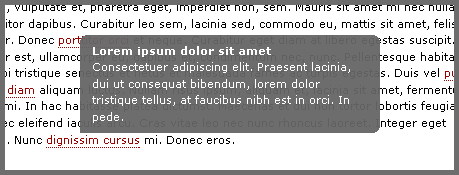
Đây là phần giới thiệu demo. Bạn hãy rê con trỏ vào các liên kết để thấy hiệu ứng. Demo 1 là kiểu tooltip có background và Demo 2 là kiểu tooltip không có background.
Ut tincidunt nisi quis elit dignissim mattis. Phasellus sit amet nunc eu est scelerisque tincidunt sit amet vitae sem. Sed ut nisi lorem. Vivamus ut felis libero. Vivamus venenatis justo ante. Nunc elementum interdum dolor, sit amet condimentum diam fermentum ac. Sed dictum condimentum arcu, id ornare turpis accumsan eu. Praesent ultricies egestas nulla at consectetur. Nunc sed est nulla, sit amet aliquam purus. Nam semper lacinia egestas. Nunc dictum lobortis arcu at bibendum?
Donec commodo nulla et magna malesuada a euismod metus aliquam. In hac habitasse platea dictumst. Vivamus mattis, nisi ac commodo cursus, metus justo eleifend sem, non auctor nisi felis eu tellus. Duis convallis condimentum elit, quis ullamcorper odio commodo ac. Aliquam ornare commodo fermentum. Aenean ut diam sed.
Donec commodo nulla et magna malesuada a euismod metus aliquam. In hac habitasse platea dictumst. Vivamus mattis, nisi ac commodo cursus, metus justo eleifend sem, non auctor nisi felis eu tellus. Duis convallis condimentum elit, quis ullamcorper odio commodo ac. Aliquam ornare commodo fermentum. Aenean ut diam sed.
Bước 1. Đặt đoạn code sau đây vào trước thẻ </head>.
<script type="text/javascript">
var tooltip=function(){
var id = 'tt';
var top = 3;
var left = 3;
var maxw = 300;
var speed = 10;
var timer = 20;
var endalpha = 95;
var alpha = 0;
var tt,t,c,b,h;
var ie = document.all ? true : false;
return{
show:function(v,w){
if(tt == null){
tt = document.createElement('div');
tt.setAttribute('id',id);
t = document.createElement('div');
t.setAttribute('id',id + 'top');
c = document.createElement('div');
c.setAttribute('id',id + 'cont');
b = document.createElement('div');
b.setAttribute('id',id + 'bot');
tt.appendChild(t);
tt.appendChild(c);
tt.appendChild(b);
document.body.appendChild(tt);
tt.style.opacity = 0;
tt.style.filter = 'alpha(opacity=0)';
document.onmousemove = this.pos;
}
tt.style.display = 'block';
c.innerHTML = v;
tt.style.width = w ? w + 'px' : 'auto';
if(!w && ie){
t.style.display = 'none';
b.style.display = 'none';
tt.style.width = tt.offsetWidth;
t.style.display = 'block';
b.style.display = 'block';
}
if(tt.offsetWidth > maxw){tt.style.width = maxw + 'px'}
h = parseInt(tt.offsetHeight) + top;
clearInterval(tt.timer);
tt.timer = setInterval(function(){tooltip.fade(1)},timer);
},
pos:function(e){
var u = ie ? event.clientY + document.documentElement.scrollTop : e.pageY;
var l = ie ? event.clientX + document.documentElement.scrollLeft : e.pageX;
tt.style.top = (u - h) + 'px';
tt.style.left = (l + left) + 'px';
},
fade:function(d){
var a = alpha;
if((a != endalpha && d == 1) || (a != 0 && d == -1)){
var i = speed;
if(endalpha - a < speed && d == 1){
i = endalpha - a;
}else if(alpha < speed && d == -1){
i = a;
}
alpha = a + (i * d);
tt.style.opacity = alpha * .01;
tt.style.filter = 'alpha(opacity=' + alpha + ')';
}else{
clearInterval(tt.timer);
if(d == -1){tt.style.display = 'none'}
}
},
hide:function(){
clearInterval(tt.timer);
tt.timer = setInterval(function(){tooltip.fade(-1)},timer);
}
};
}();
</script>
var tooltip=function(){
var id = 'tt';
var top = 3;
var left = 3;
var maxw = 300;
var speed = 10;
var timer = 20;
var endalpha = 95;
var alpha = 0;
var tt,t,c,b,h;
var ie = document.all ? true : false;
return{
show:function(v,w){
if(tt == null){
tt = document.createElement('div');
tt.setAttribute('id',id);
t = document.createElement('div');
t.setAttribute('id',id + 'top');
c = document.createElement('div');
c.setAttribute('id',id + 'cont');
b = document.createElement('div');
b.setAttribute('id',id + 'bot');
tt.appendChild(t);
tt.appendChild(c);
tt.appendChild(b);
document.body.appendChild(tt);
tt.style.opacity = 0;
tt.style.filter = 'alpha(opacity=0)';
document.onmousemove = this.pos;
}
tt.style.display = 'block';
c.innerHTML = v;
tt.style.width = w ? w + 'px' : 'auto';
if(!w && ie){
t.style.display = 'none';
b.style.display = 'none';
tt.style.width = tt.offsetWidth;
t.style.display = 'block';
b.style.display = 'block';
}
if(tt.offsetWidth > maxw){tt.style.width = maxw + 'px'}
h = parseInt(tt.offsetHeight) + top;
clearInterval(tt.timer);
tt.timer = setInterval(function(){tooltip.fade(1)},timer);
},
pos:function(e){
var u = ie ? event.clientY + document.documentElement.scrollTop : e.pageY;
var l = ie ? event.clientX + document.documentElement.scrollLeft : e.pageX;
tt.style.top = (u - h) + 'px';
tt.style.left = (l + left) + 'px';
},
fade:function(d){
var a = alpha;
if((a != endalpha && d == 1) || (a != 0 && d == -1)){
var i = speed;
if(endalpha - a < speed && d == 1){
i = endalpha - a;
}else if(alpha < speed && d == -1){
i = a;
}
alpha = a + (i * d);
tt.style.opacity = alpha * .01;
tt.style.filter = 'alpha(opacity=' + alpha + ')';
}else{
clearInterval(tt.timer);
if(d == -1){tt.style.display = 'none'}
}
},
hide:function(){
clearInterval(tt.timer);
tt.timer = setInterval(function(){tooltip.fade(-1)},timer);
}
};
}();
</script>
Bước 2. Đặt đoạn code sau đây vào trước thẻ </head>.
<style>
.hotspot {
color: #94D5FD;
cursor: pointer;
font-weight: bold;
font-family: Arial, Tahoma;
font-size: 13px;
}
#tt {
background: CornflowerBlue;
color: #FFF;
display: block;
font-family: Arial;
font-size: 16px;
padding: 5px 10px;
position: absolute;
-moz-border-radius: 10px;
}
</style>
.hotspot {
color: #94D5FD;
cursor: pointer;
font-weight: bold;
font-family: Arial, Tahoma;
font-size: 13px;
}
#tt {
background: CornflowerBlue;
color: #FFF;
display: block;
font-family: Arial;
font-size: 16px;
padding: 5px 10px;
position: absolute;
-moz-border-radius: 10px;
}
</style>
Ở kiểu Demo 1, sử dụng background: CornflowerBlue;. Ở kiểu Demo 2, sử dụng background: transparent;.
Bước 3. Thiết lập cấu trúc HTML như sau.
<span class="hotspot" onmouseover="tooltip.show('Nội dung mô tả ngắn');" onmouseout="tooltip.hide();"> text liên kết </span>
Nếu trong phần mô tả, bạn muốn sử dụng các thẻ HTML thì phải mã hóa dấu < thành < và dấu > thành >.
Nếu sử dụng hình ảnh làm phần mô tả liên kết thì sử dụng cấu trúc như sau.
<span class="hotspot" onmouseover="tooltip.show('<img src=\'URL_hình ảnh\'/>');" onmouseout="tooltip.hide();"> text liên kết </span>
Cập nhật: Theo yêu cầu của bạn hoang-deejay, bạn ấy muốn sử dụng hiệu ứng này cho hình ảnh. Vậy đối với hình ảnh thì sử dụng cấu trúc HTML như sau.
<span class="hotspot" onmouseover="tooltip.show('Nội dung mô tả ngắn cho hình ảnh');" onmouseout="tooltip.hide();"> <img src="URL_hình ảnh" /> </span>
Ví dụ:

Bạn có thể tạo hiệu ứng này cho blogspot tương tự như các bước sử dụng cho website.
Chúc bạn thành công! :7)